For facilities managers overseeing electronics manufacturing, server rooms or pharmaceutical laboratories, the flooring is a critical defense against electrostatic discharge (ESD).

Proper cleaning and maintenance of your ESD flooring system is non-negotiable for preserving its conductivity and guaranteeing long-term protection for sensitive components and personnel. This guide outlines the essential protocols needed to ensure your electrostatic dissipative flooring functions reliably for years after the initial installation.
Understanding ESD Flooring and Contamination Risks
ESD flooring is specifically designed to safely dissipate static electricity to ground, preventing damaging electrical discharges. However, this conductivity is highly susceptible to compromise from common cleaning mistakes and incorrect maintenance products.
Any ESD flooring system, whether it’s a static-dissipative tile, epoxy or polyurethane resin, relies on conductive pathways within the material to channel charge away. Contamination is the primary enemy of this system. Using standard floor wax, oil-based cleaners or detergents that leave behind insulating residues will effectively create an electrical barrier between the surface and the ground. This negates the protective function of the floor, rendering the entire system useless. Therefore, a specialised cleaning regime is paramount for environments that depend on this level of protection.
The Daily Cleaning Protocol for ESD Flooring
A daily cleaning routine must focus on removing dirt and particulates, which can also carry static charges. But this must be without introducing insulating contaminants that compromise the floor's electrical resistance. Water should be used sparingly and only with approved chemicals.
-
Dry Cleaning First: Always begin with dry methods. Use a vacuum cleaner equipped with ESD flooring safe attachments or a microfiber mop to remove loose dust and debris. This prevents abrasion and stops particulates from being spread when wet cleaning begins.
-
Use Neutral, ESD-Safe Cleaners: Select a dedicated, pH-neutral cleaner specifically formulated for electrostatic dissipative flooring. These solutions contain non-ionic surfactants that clean effectively without leaving an insulating film or residue that impedes the floor’s conductivity.
-
Two-Bucket Method (Recommended): Use one bucket for the cleaning solution and a separate bucket for rinse water. This prevents the soiled water from being reapplied to the floor, ensuring maximum cleanliness and conductivity.
-
Avoid Wax and Polishes: Absolutely never apply standard floor waxes, oil-based cleaners or abrasive powders. These products contain insulating materials that will completely block the flow of static electricity, destroying the integrity of your ESD flooring.
Weekly and Monthly Maintenance Checks
While daily cleaning addresses dirt, weekly and monthly checks are required to proactively verify the performance of the electrostatic dissipative flooring and address more stubborn stains or wear.
-
Spot Cleaning: Address stubborn stains immediately using the approved neutral cleaner. Do not use strong solvent-based cleaners unless specified by the manufacturer, as these can damage the resin finish.
-
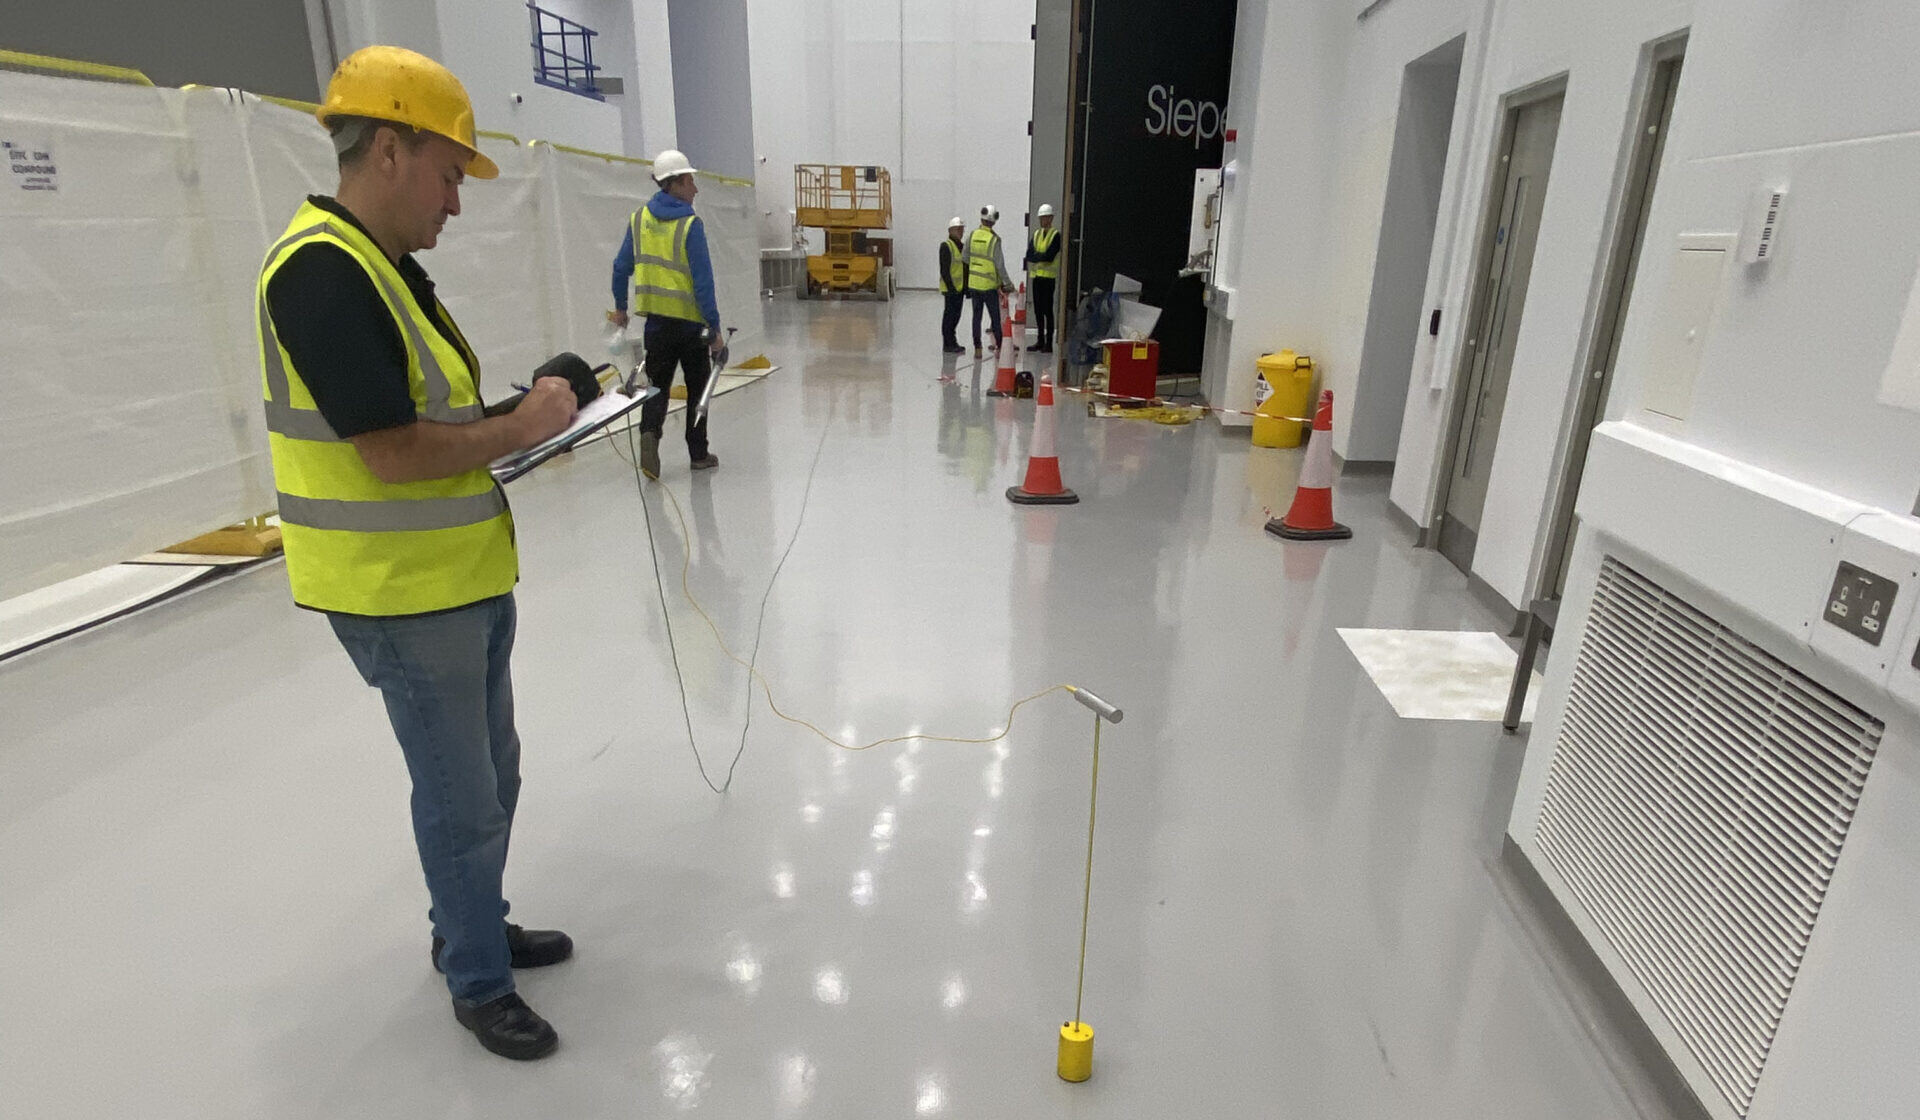
Conductivity Testing: The most critical step is regularly testing the floor's electrical resistance. Use a specialised resistance meter to check the surface-to-ground resistance (Rs-G) across multiple points. This confirms the ESD flooring is operating within the required range (typically to ohms for dissipative floors). Document these readings monthly as part of your safety protocol.
-
Inspecting Seams and Joints: Carefully check seams, coving and joints, especially if the floor was laid following an ESD flooring installation using tiles. Ensure no lifting or cracking has occurred that could trap moisture or expose the conductive underlayer.
Long-Term Integrity and The Role of ESD Flooring Installation
The longevity and reliable performance of the floor are inextricably linked to the quality of the initial ESD flooring installation. Proper preparation and the use of correct materials ensure the system retains its electrical properties over time.
If you notice widespread areas failing conductivity tests, it may indicate a deeper issue stemming from the ESD flooring installation itself (such as poor grounding connections or an incorrect primer application). Addressing these issues early prevents larger failures.
When dealing with deep damage or worn areas
-
Avoid DIY Repairs: Never use non-ESD specific patch or repair kits. These materials will be insulators, creating high-resistance hot spots that defeat the purpose of the electrostatic dissipative flooring system.
-
Professional Resealing: After several years, heavy foot traffic may wear down the protective top coat. A specialist contractor can apply an approved conductive sealer or clear topcoat. This restores the surface protection and extends the floor's lifespan without compromising its static dissipation properties.ESD flooring
Maintaining your ESD flooring proactively ensures compliance, protects highly sensitive electronic components and secures the operational efficiency of your facility, confirming the value of the initial investment in the ESD flooring installation.
To find out more about how to choose the right kind of industrial flooring (including highly specific electrostatic dissipative flooring) get in touch with a member of our expert team here at Central Flooring Services. Schedule your free, on-site consultation today, where we will conduct a full assessment of your compliance needs and recommend a system engineered for decades of protection.

Image Source: Canva
Buckingham Group Contracting

Benefits Of Installing Decorative Resin Flooring